Version française: Passer son CMS à une version plus récente de php
This document aims at guiding you through the steps needed to change the PHP version used by your website.
It is very similar from one CMS to another. Please note that the scope of this documentation is to cover only the most commonly used ones:
You'll also find links to the official SPIP documentation in the External resources section.
Keep in mind that modifying the PHP version doesn't directly affect your website content (files / databases), and can be reverted at any time in case changing it causes any problem.
If you're confident your website will properly work using the PHP version you aimed at, you can directly go to the "Change PHP version" section. You can also check our FAQ "How to change the PHP version of a sub-domain".
Note that any custom themes, modules, or plugins may have different compatibilities.
Summary
To be able to follow this procedure, you must be able to log into your hosting account. If you forgot your password, you can request a new password from the log in page.
Regardless of the CMS used, the steps are overall the same:
- Check your CMS current version
- Check the compatibility between your CMS and a newer PHP version
- Make a full backup (files and databases)
- Upgrade your CMS (if needed)
- Change the PHP version
- Check that your website is working properly
If you're unsure about a step, or have questions, you can contact our help-desk at any time to get support.
If an upgrade is needed and you don't want to do it yourself, our web development team may be able to help - depending on the needed skills and availability - and could prepare a quote to take care of it for you. Please keep in mind that the work calendar of the web team is quite full, so we recommend that you get in touch with us at your earliest convenience.
Check CMS current version
In most cases, the current version is displayed on your CMS's admin panel, or in the configuration file of your website.
WordPress
- log into your admin panel
- usually displayed at the bottom right, unless an update is available
displayed on the dashboard homepage, in the "at a glance" box (ex.: WordPress 5.9.3 using TwentyTwenty)
Drupal
- log into your admin panel
- go to "Reports", then in "Status Report"
- the version is displayed at the top (e.g.: Drupal 6.60)
Joomla
- log into your admin panel
- get into the "Informations", "Help", "Site" or "System" section (depending version), then in the "system information" tab
- find a line "Joomla version"
NextCloud
- log into your admin panel
- go to the settings page from the user menu (top right)
- on the left side, under "Administration", choose "Overview"
MediaWiki
There are different ways to check the MediaWiki version, depending on the currently used version:
visit your website at: monsite.wiki/Special:Version
- check the source code of any page:
- hit CTRL+U or use your browser menus to show the source code (commonly under "tools")
search for "generator" (CTRL+F) to find the meta HTML tag showing the version (e.g.: <meta name="generator" content="MediaWiki 1.34.4"/>)
- in the configuration file
if a "DefaultSettings.php" file exists: search for a variable wgVersion which shows the version (e.g.: $wgVersion = '1.25.1';)
otherwise, open the file at "/includes/Defines.php" and search for MW_VERSION (e.g.: define( 'MW_VERSION', '1.37.1' );)
Check compatibility between a CMS and a PHP version
We strongly recommend to aim for the php 8.1 version.
- php 7.0 reached its end of life in December 2017, and the last security updates have been done in December 2018
- php 7.3 reached its end of life in December 2020, and the last security updates have been done in December 2021
Once you've established which version is being used, check the chart below and make sure your CMS is ready for the target php version.
If you CMS does support the newer version, you can directly move on to the "Change PHP version" section.
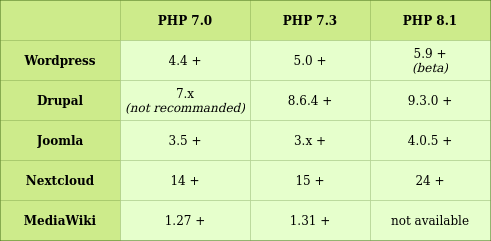
For SPIP:
- PHP 8.1: SPIP 4.1+
- PHP 7.3: SPIP 3.2+
- PHP 7.0: SPIP 3.1+
For more details about compatibility between version, please visit the page related to your CMS in the #External_resources section.
Make a full backup
Before any changes, no matter which CMS is being used, a backup is mandatory.
Most CMS offer plugins making this easier (e.g.: X-cloner or UpdraftPlus for WordPress).
This procedure doesn't cover the dozens of existing plugins. It focuses on the manual procedure to do so, which is common to most CMS.
For more details about backups, please check your CMS's official documentation (see #External_resources).
In most cases, it involves backing up:
- the database(s)
- the files
Please note that whatever happens, we backup all your data everyday and keep them for 5 days. If the process goes badly and you didn't make your own backups, it will be possible to ask for a complete restoration (fees apply to any restoration work).
Database
Head to AlternC.
To list existing databases, click on "Databases" on the left side panel.
To display the details (user, password, permissions...), or get to PhpMyAdmin to see your database content, click on "Show settings".
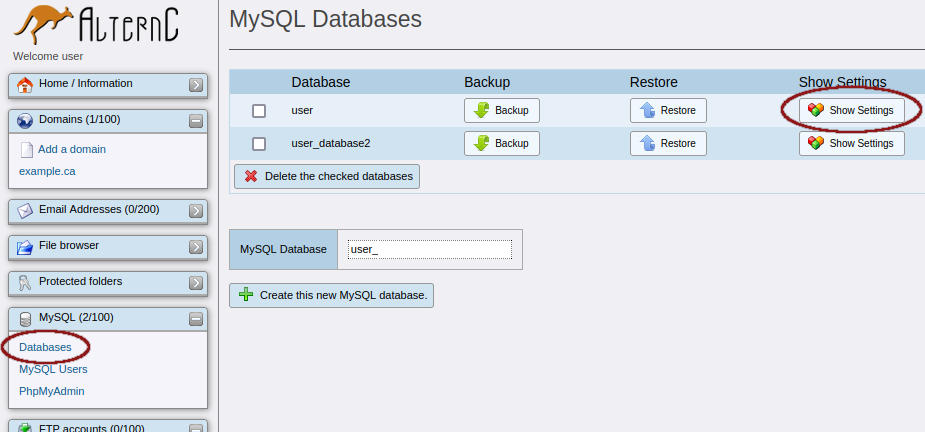
You can also access PhpMyAdmin directly from the side panel, under "Databases".
If you only have one database, you can move on to the next step in order to back it up.
If you have multiple databases, and are unsure about which one should be saved, go on with the next section.
Determine which database to backup
The database connection details are usually written in a file placed in your website root folder.
If you don't know what database is related to your CMS because you have multiple databases, you'll have to determine which one stores your website data.
- Wordpress
- file: wp_config.php
- look for:
define('DB_NAME', 'your_database_name'); - Drupal
- file: sites/default/settings.php
- look for:
 $databases['default']['default'] = [
  'database' => 'your_database_name',
  ...
 ];
- Joomla
- file: configuration.php
- look for:
$db = 'your_database_name';
- Nextcloud
- file: config.php
- look for:
'dbname' => 'your_database_name',
file: LocalSettings.php
- look for:
$wgDBname = 'your_database_name';
To access the file, click on the "File browser" in the side panel, reach your website root directory, and find you CMS's configuration file.
Click on the file to show its content. E.g.:
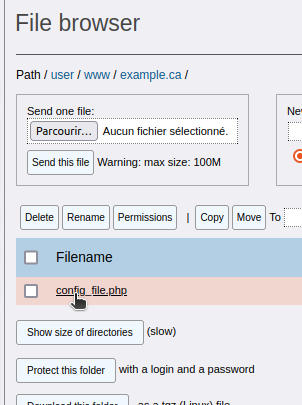
If you're unsure about the website root directory, check the #Files section to make sure where are your website files stored.
Export database
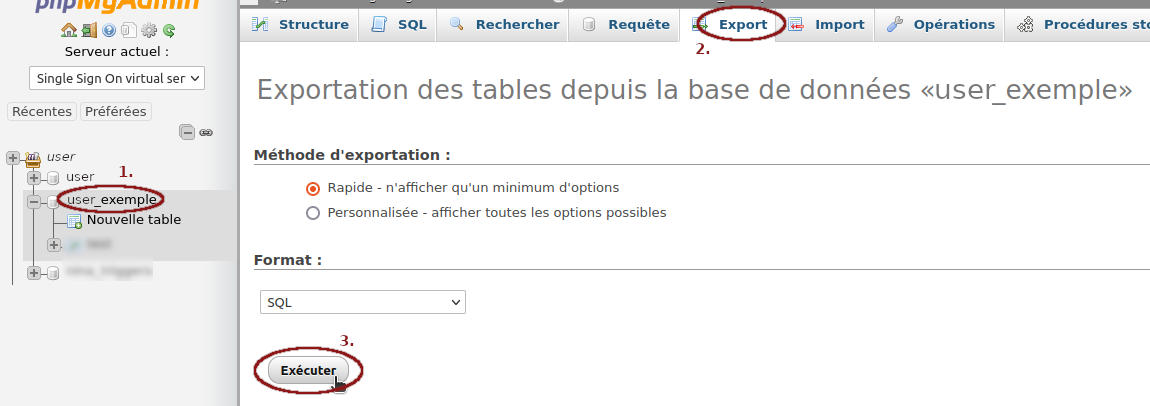
Connect to PhpMyAdmin from the database settings or the side panel (MySQL section > PhpMyAdmin).
In the databases management interface, click on your database name on the left side.
Then, click on the "Export" tab at the top.
Leave the settings as is (quick/SQL), and click "Go" to save the database on your computer.
Files
The files of your website root directory must be backed up too.
By clicking on your domain to edit it, on alternC's side panel, you should see a field "Locally hosted..." and a directory displayed right under it: this is your website's root directory.
You can click on the directory in order to access the file browser. You can also use the "File browser" section displayed on the left hand menu.
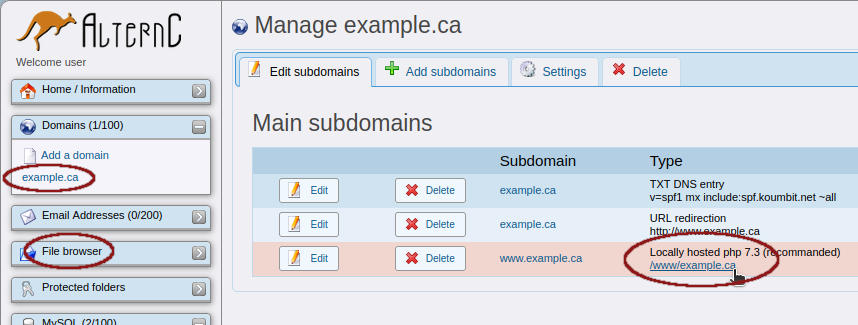
If you can't see anything like "Locally hosted..." in the fields, your website might be using HTTPS. In such a case, the fields are shown under the "Advanced subdomains section" and are not available for non-admins users. You can still access the files through the File browser.
If you're not using HTTPS, you website might be hosted somewhere else (it could be on a private server for instance).
Do not hesitate to contact us if you have question regarding this.
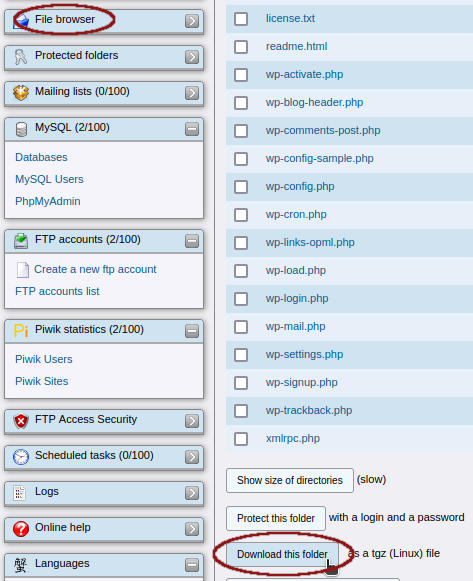
Once in your root directory, in the file browser, click on "Download this folder" at the bottom to get an archive of your files. Note that it can take a while, depending on your folder size.
Upgrade
Unfortunately, this documentation can't cover all the specific steps to upgrade each existing CMS.
We invite you to refer to your CMS's official documentation in the #External_resources section.
Once upgraded to a version of your CMS compatible with the php version you aim at, you can move on to the last step: changing the PHP version used by your website.
WordPress: it's recommanded to update the core first, then themes, plugins and finally translations
- Drupal: it's recommanded to update modules prior to updating the core
Change PHP version
Before changing the PHP version, we recommand to temporarily lower the domain TTL (time to live) to 600s. This way, changes will be applied faster, and you'll be able to reverse the change quicker in case anything goes wrong.
To do so, click on the "Settings" tab from the domain edition page. Take note of the currently used TTL in order to put it back at its original value once done:
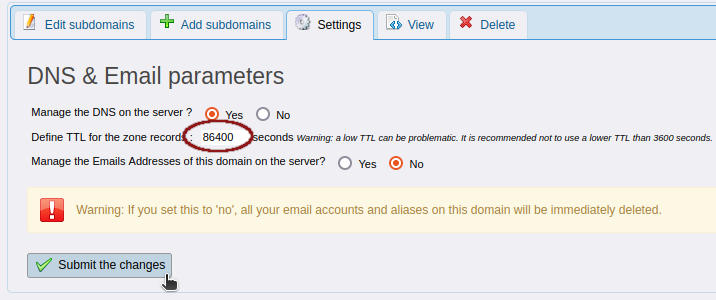
Wait for the original TTL time (usually 3600s / 1h) before doing any change.
When ready, click on your domain, then on the "edit" button" on the left:
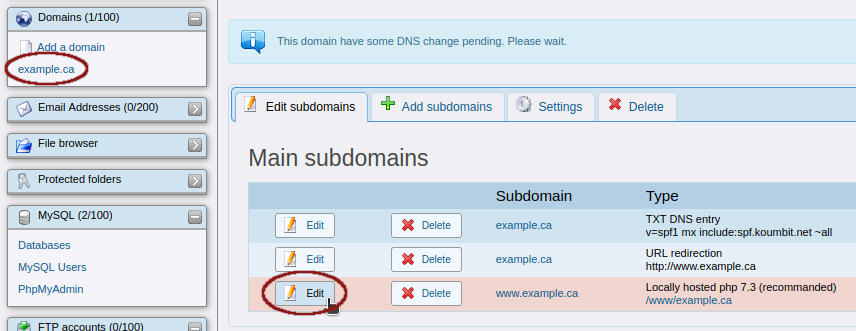
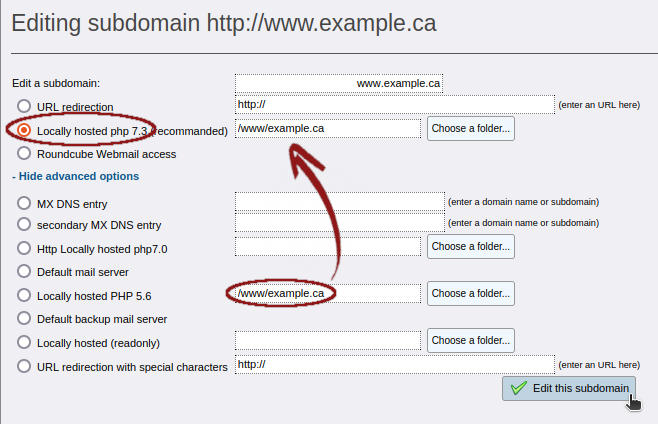
Copy-paste the current path to your root directory in the corresponding field for the new php version, and check the radio button next to it:
Example with a change from PHP 7.3 to PHP 8.1:
Now, it's time to check that your website is running smoothly! (Make sure you let time for the change to apply).
If you see any problem, change back to your original PHP version to revert the modification.
If everything looks good, congratulations, you're done and you can change your domain's TTL back to its original value!
External DNS
If your DNS zone isn't managed in alternC, here are the DNS records you'll need (A or CNAME):
- PHP 8.1
- A: 199.58.80.35
- CNAME: lb-php81.koumbit.net
- PHP 7.3
- A: 199.58.80.31
- CNAME: lb-php73.koumbit.net
External resources
WordPress
Php compatibility chart: https://make.wordpress.org/core/handbook/references/php-compatibility-and-wordpress-versions/
Upgrade (FR): https://fr.wordpress.org/support/article/updating-wordpress/
Upgrade (EN): https://wordpress.org/support/article/updating-wordpress/ (extended: https://wordpress.org/support/article/upgrading-wordpress-extended-instructions/)
Full backup (FR): https://fr.wordpress.org/support/article/wordpress-backups/
Full backup (EN): https://wordpress.org/support/article/wordpress-backups/
Drupal
Upgrade (FR): https://www.drupal.org/fr/docs/user_guide/fr/security-update-core.html
Upgrade (EN): https://www.drupal.org/docs/user_guide/en/security-update-core.html
Upgrade modules (FR): https://www.drupal.org/fr/docs/user_guide/fr/security-update-module.html
Upgrade modules (EN): https://www.drupal.org/docs/user_guide/en/security-update-module.html
Upgrade themes (FR): https://www.drupal.org/fr/docs/user_guide/fr/security-update-theme.html
Upgrade themes (EN): https://www.drupal.org/docs/user_guide/en/security-update-theme.html
Full backup (FR): https://www.drupal.org/fr/docs/user_guide/fr/prevent-backups.html
Full backup (EN): https://www.drupal.org/docs/user_guide/en/prevent-backups.html
Joomla
Upgrade (FR): https://docs.joomla.org/Portal:Upgrading_Versions/fr
Upgrade (EN): https://docs.joomla.org/Portal:Upgrading_Versions
Full backup (FR): https://docs.joomla.org/Backup_Basics_for_a_Joomla!_Web_Site/fr
Full backup (EN): https://docs.joomla.org/Backup_Basics_for_a_Joomla!_Web_Site
SPIP
Requirements (FR) : https://www.spip.net/fr_article4351.html
Requirements (EN) : https://www.spip.net/en_article6659.html
Upgrade (FR): https://www.spip.net/fr_article1318.html
Upgrade (EN): https://www.spip.net/en_article2154.html
NextCloud
Upgrade (EN): https://docs.nextcloud.com/server/latest/admin_manual/maintenance/upgrade.html
Full backup (EN): https://docs.nextcloud.com/server/latest/admin_manual/maintenance/backup.html
System requirements (last version): https://docs.nextcloud.com/server/latest/admin_manual/installation/system_requirements.html
- For a specific version requirements, click on "v:latest" at the bottom of the side panel to change the version
Go to Installation > System requirements from the left side panel
MediaWiki
Php compatibility chart: https://www.mediawiki.org/wiki/Compatibility#PHP
Upgrade (FR): https://www.mediawiki.org/wiki/Manual:Upgrading/fr
Upgrade (EN): https://www.mediawiki.org/wiki/Manual:Upgrading
Full backup (FR): https://www.mediawiki.org/wiki/Manual:Backing_up_a_wiki/fr
Full backup (EN): https://www.mediawiki.org/wiki/Manual:Backing_up_a_wiki
 Le Wiki Koumbit